Introducing TrophyTracks | Mobile Hunting App
Quick Start Guide for the all-new TrophyTracks Mobile!
TrophyTracks is different from any other mobile hunting app that some hunters use today. Our app is a tool used to keep a personal journal that documents everything observed while hunting or tracking. Users can keep track of locations, observations, harvests, notes, and even upload relevant pictures as part of a scouting trip or hunt.
Getting Started with TrophyTracks
The following is a step-by-step guide for using the all-new TrophyTracks mobile hunting app. The process is simple and fast and you will be logging hunts in a matter of minutes. If experiencing trouble, please contact our support team.
Step #1 – Downloading TrophyTracks
Please visit the Google Play Store or the App Store to download TrophyTracks to the device of your choosing.
Step #2 – Register and Sign In
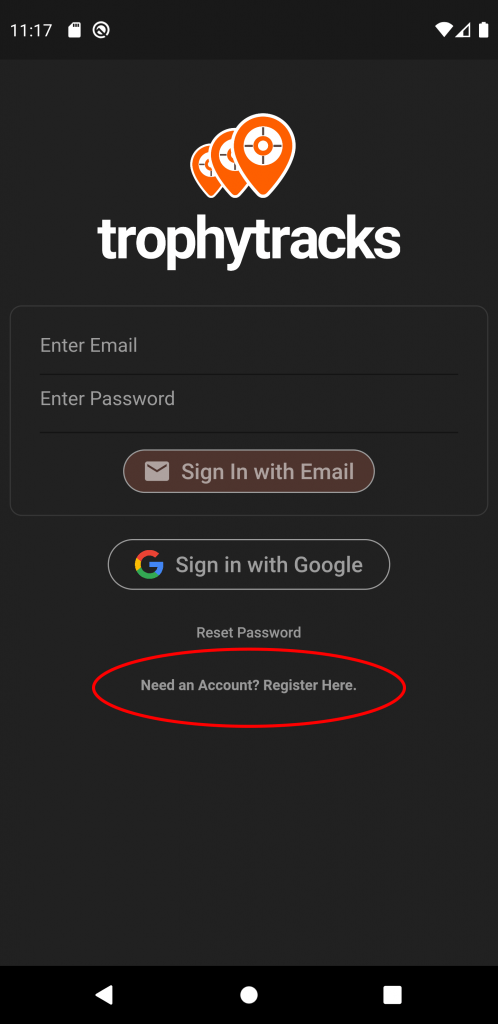
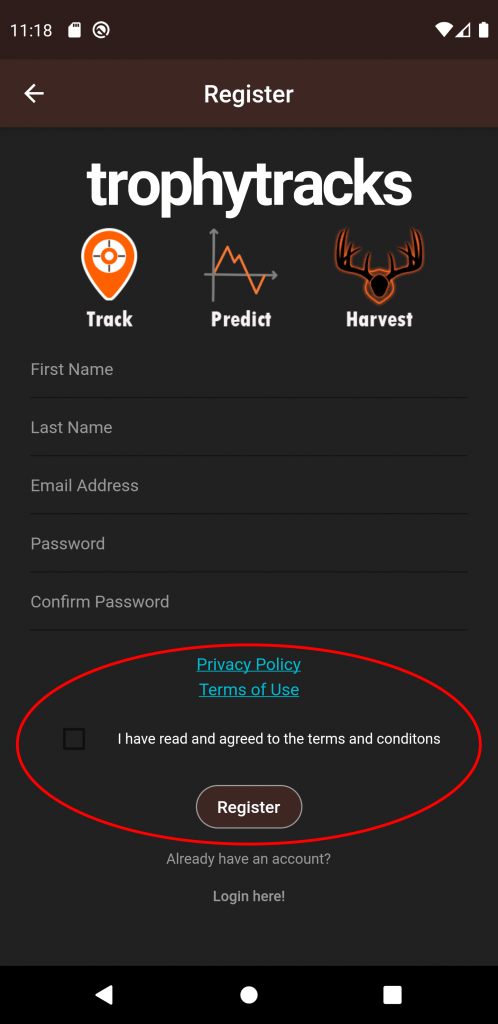
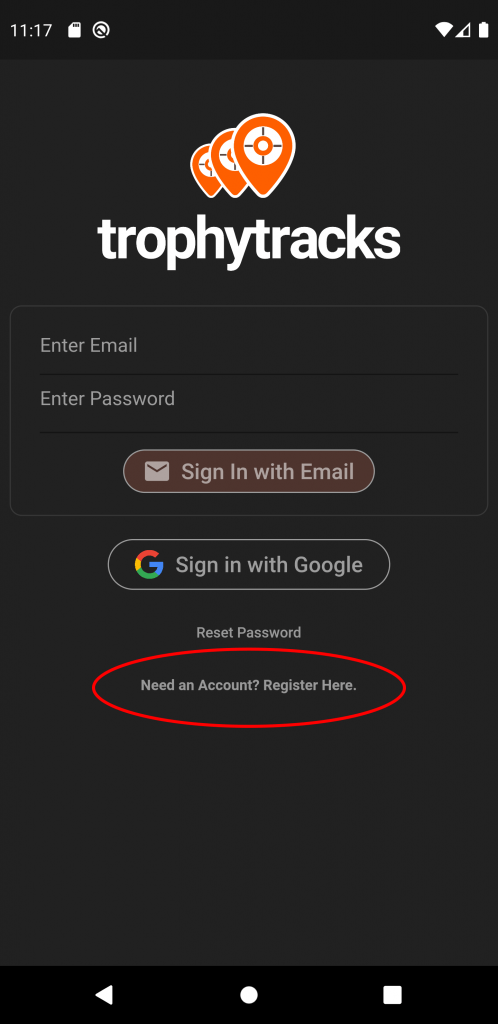
Once downloaded, either create an account by selecting “Register Here” or Sign In with Google. If registering a new account, please review and acknowledge our Privacy Policy and Terms of Use. Then log in with your registered credentials.
Step #3 – Exploring the Home Page
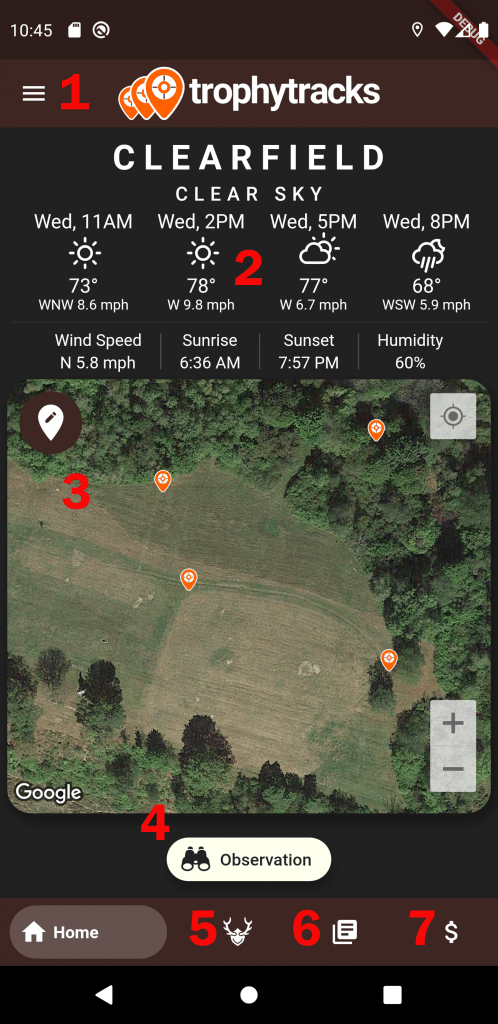
From the TrophyTracks homepage, you can access the App Settings and your User Profile (1). See all relevant Weather Information based on the current location (2). Pin all of your favorite locations to the Map via a ‘long press’ (3). Record an Observation anywhere at any time (4). On the bottom navigation bar, you can start a new hunt by clicking the Antler Icon (5), view recorded hunts and observations by selecting the Log Icon (6), and sign up for TrophyTracks “PRO” by selecting the Dollar Icon (7).
Step #4 – Starting a New Hunt
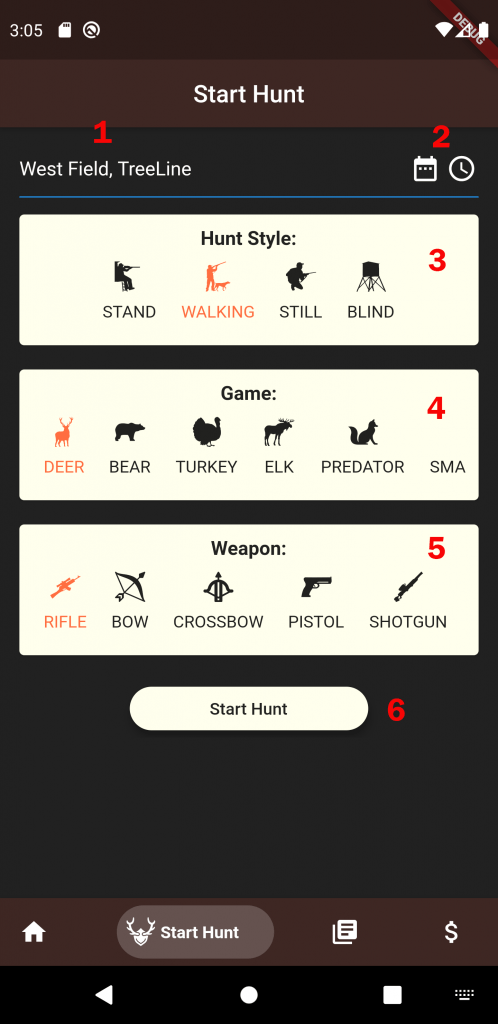
After selecting the Antler Icon (Start Hunt), users are brought to the Start Hunt Screen. Here, you can name your Hunt, or leave it to default to the current date and time (1), change the Date/Time (2), Select the Hunt Style (3), Game (4), and Weapon (5). (Swipe left and right for more Game and Weapon Options). Now, click the “Start Hunt” button (6) to begin!
Step #5 – Logging Hunt Activity
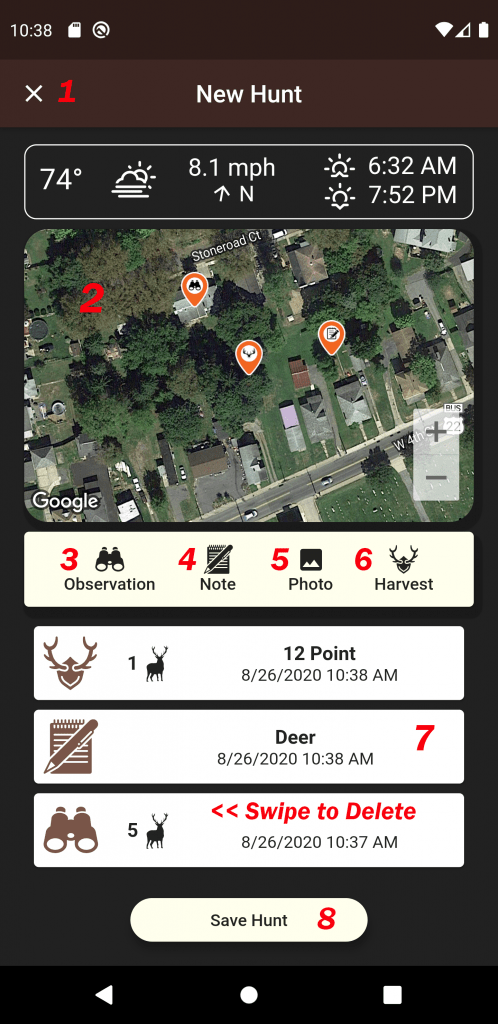
This is the place where you will spend the most time during your hunt. Here you have access to the map and the weather. There is no need to exit this screen until your hunt is complete. If you have to leave or want to cancel the hunt, just click the ‘X’ button in the top left of the screen (1). The map (2), centers on your exact location. Every time you create an Observation (3), take a Note (4) capture/upload a Photo (5), or Harvest (6) a notated pin will appear at your location. (Be sure to move the map if you would like to place the pin at a specific location).
Once an item is created, it will appear below the map in a swipeable card (7). The information saved to these cards is what will appear in your hunt log once it is saved. Just swipe to delete the individual cards if you’ve made a mistake. Now that you’ve completed a hunt, press the “Save Hunt” button (8) at the bottom of the screen to save the hunt to the database. Now, all of that information, including the weather and location is saved.
Step #6: Viewing Saved Hunts
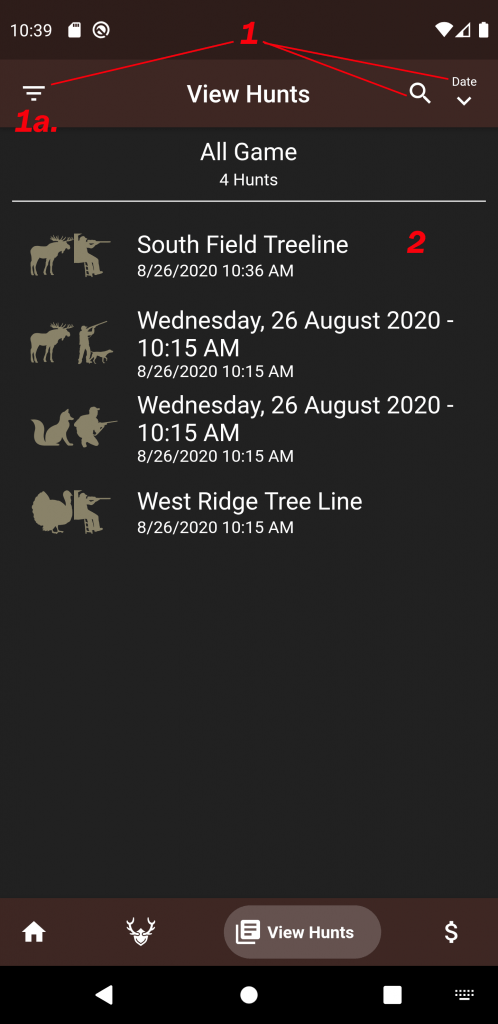
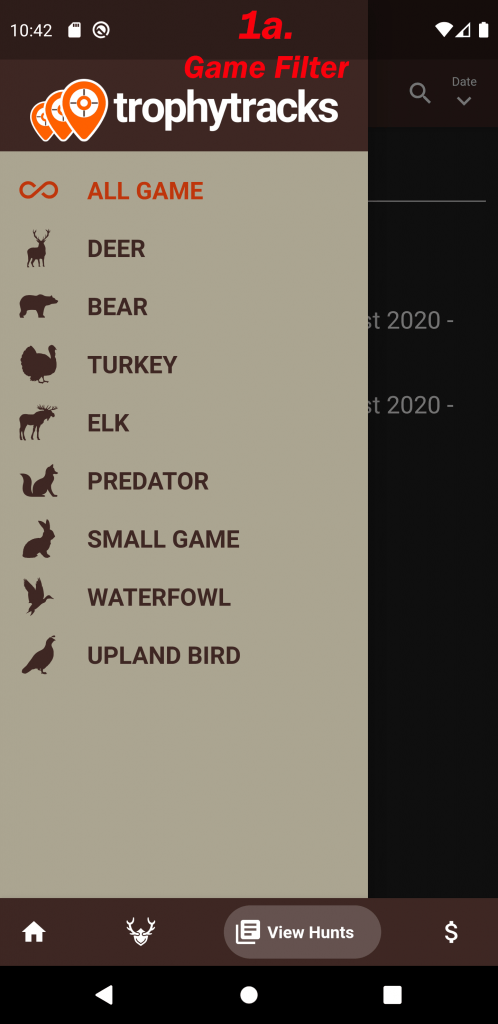
View saved hunts on your mobile hunting app by clicking on the “NoteCard” icon in the bottom navigation bar. Once on the “View Hunts” page, there are three ways to select the hunts you would like to see (1). Hunts can be searched by keyword by clicking the magnifying glass icon, or Filtered by Game Animal (1a). The hunt list is also sortable by Date. Selecting the Hunt Title (2) will open the saved hunt log.
Step #6: Continued…
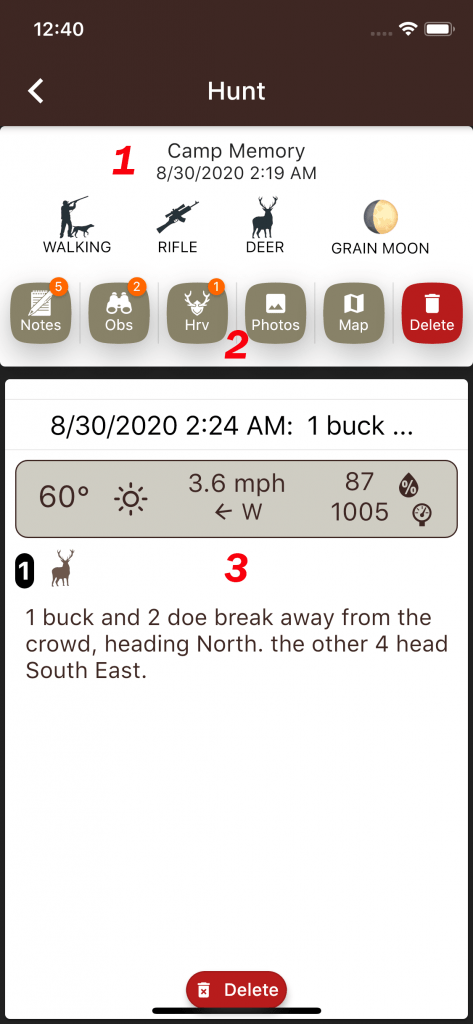
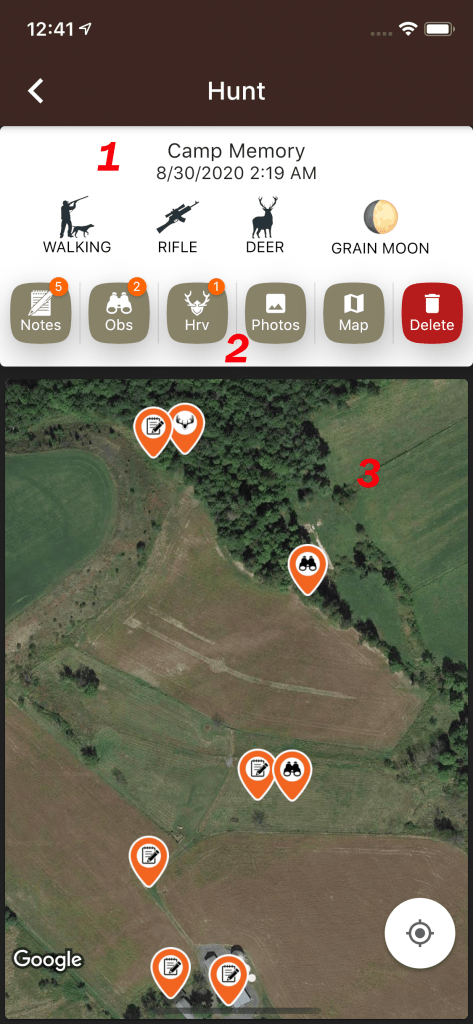
After selecting an item from the list, the “Hunt” screen opens. On this screen, all relevant information from the hunt is shown. The title and date, style, weapon, and game are listed, as well as the moon phase (1). Just below the main hunt info, all of your observations, notes, photos, harvests, and map markers are selectable (2). Your selections will be viewable in the bottom portion of the screen (3). The weather information that was recorded during the hunt will be available to you until the hunt is deleted. If you are a Pro User, these items will all be editable from this screen. Simply press the back button to return to the hunt list.
Step #7: Be at the Right Place, at the Right Time!
Now that you have the skills to use the TrophyTracks mobile hunting app, get out there, and find the harvest of your dreams!! Also, be sure to check out TrophyTracks Pro! Pro is currently in development, but we promise; it is worth the wait! With a Pro account, you will be able to upload unlimited photos, share your hunts and harvests with friends and we will provide you with total statistics for every single hunt logged, and much more!




Comments are closed.